Your automatic inspection machine has been running for three shifts straight. The reject rate suddenly creeps up—not dramatically, just enough to notice. You check the camera feed. The image looks slightly hazy, but nothing obvious. A few more hours pass. Now labels that should have passed are being rejected, and a few defective ones have slipped through.
The problem isn't the software. It isn't the algorithm. It's a 0.1mm film of dust on the camera lens.
Vision inspection systems fail silently. Unlike a motor that stops or a belt that breaks, a camera with a dirty lens continues to produce images—they are simply less accurate. Dust, ink mist, adhesive residue, and fingerprints collect gradually. The system keeps running, accepting or rejecting products based on degraded image data, until a customer complaint or a recall forces the investigation that should have been prevented by preventive maintenance.
This guide answers the question that every quality manager and production supervisor needs to know: how often should you clean the cameras on your automatic inspection machine? And more importantly, how do you do it correctly without damaging expensive optical components?
The cameras on an automatic inspection machine are its eyes. Every defect detection—missing labels, misprints, registration errors, barcode flaws—depends on the quality of the image captured by these cameras.
When dust, ink mist, or adhesive residue accumulates on the lens, several things happen:
Image sharpness degrades—the system struggles to distinguish fine details
Contrast is reduced—defects become harder to detect against the background
False rejects increase—clean labels may be flagged as defective
Missed defects occur—actual defects pass through undetected
Research indicates that a 0.1mm film of dust can reduce inspection accuracy from 99.8% to below 99.5%. For a high-speed label line running 150 meters per minute, that seemingly small drop in accuracy can translate into hundreds of defective labels reaching customers each day—and potentially tens of thousands of dollars in recall costs.
The good news is that this problem is entirely preventable with a disciplined cleaning schedule.
Cleaning frequency depends on three factors: the operating environment, the type of contaminants present, and the machine's usage intensity. A label plant running adhesive-coated materials in a dusty environment will need more frequent cleaning than a cleanroom operation.
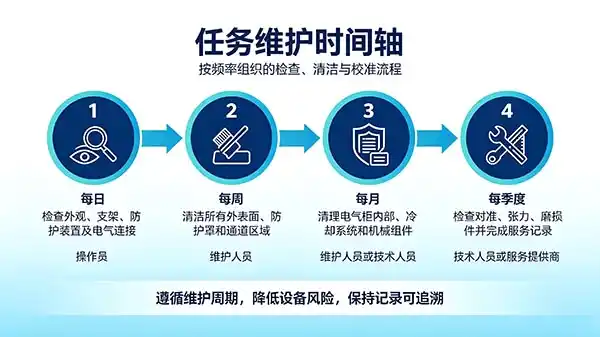
Here is a tiered framework based on industry best practices:
| Frequency | Tasks | Who Should Do It |
|---|---|---|
| Daily / Per Shift | Quick visual inspection; blow away loose dust; check image clarity | Operator |
| Weekly | Thorough lens cleaning with proper optics-grade materials | Operator or maintenance technician |
| Monthly | Deep cleaning of all optical surfaces; filter cleaning; lighting check | Maintenance technician |
| Quarterly | Full system calibration; comprehensive inspection of all components | Maintenance technician or service provider |
Before starting production—or at the end of each shift—perform a quick visual inspection:
Look at the camera lens for visible dust, smudges, or haze
Check that the lighting system is functioning properly
Verify that the inspection image on the display is clear and properly focused
If you notice any degradation, clean immediately rather than waiting for the scheduled weekly cleaning
Think of this like checking your mirrors before driving—a quick habit that prevents bigger problems later.
For most label production environments, weekly cleaning is the minimum recommended frequency. In wet, dusty, or high-adhesive lines, daily cleaning is considered best practice.
Weekly cleaning should include:
Thorough cleaning of all camera lenses with proper optics-grade materials
Cleaning of protective glass and plastic surfaces on inspection modules
Gentle cleaning of lighting covers
Inspection of camera mounting for looseness
Some industry sources recommend cleaning camera heads at least once per week, with shorter intervals required in challenging environments. For operations running continuous production (24/7), daily cleaning of critical optical components is strongly advised.
Monthly maintenance goes beyond surface cleaning:
Clean the vision processor filter—typically recommended once per month
Clean all glass and plastic surfaces on inspection modules
Clean beam splitters and other optical components
Perform full system calibration
Backup inspection software settings
The vision processor filter, in particular, is often overlooked. If it becomes clogged, airflow to the processor is restricted, which can cause overheating and system instability. In plants with heavy dust or ink mist, filters may need cleaning weekly rather than monthly.
Every three months, schedule a more thorough review:
Calibrate optical sensors and cameras for accuracy
Inspect all electrical connections for tightness and corrosion
Verify measurement system precision and adjust if needed
Check frame and structural components for deformation
Review inspection logs for anomalies
Cleaning a camera lens incorrectly can do more damage than not cleaning it at all. Scratches on a lens cannot be repaired; the only fix is replacement.
Air blower (manual bulb blower—never canned compressed air, which may release liquid propellant)
Lens cleaning solution (optical-grade solvent, or 99.5% anhydrous alcohol)
Microfiber lens cleaning cloth or lint-free lens tissue
Anti-static gloves (optional but recommended)
Paper towels or ordinary cloths—they can scratch the lens
Industrial-grade alcohol containing impurities—leaves residue
Bare fingers—skin oil transfers to the lens
Abrasive materials or harsh chemicals
Applying solvent directly to the lens—it may seep into the lens assembly
Always shut down the inspection system completely before cleaning. This protects the camera electronics and prevents moving parts from operating while you work. If the machine is integrated into a live production line, lock out the machine to prevent unexpected startup.
Never wipe a dry lens covered with dust particles. Dust in a printing facility often contains tiny sharp grits from paper or solid ink residues. Wiping dry dust across the lens can embed particles in the glass, causing scratches.
Use a hand-held rubber air blower, positioned about 2–3 inches from the lens surface. Blow short bursts of air from the center outward.
Do not apply lens cleaner directly onto the lens. Instead:
Put a few drops of lens cleaner onto a microfiber cloth or lint-free tissue
Use just enough to make the cloth moist—not wet
Never saturate the cloth
Place the moistened cloth against the lens. Begin at the center of the lens and carefully wipe in an outward spiral path toward the edges. This ensures that any particles are swept outward rather than dragged across the entire surface.
After cleaning, check the camera feed on the display to verify that the image is clear and free of streaks or haze.
For label converters running inspection systems as part of their finishing line, understanding how to maintain optical components is essential for consistent quality. See how automated inspection integrates into label finishing workflows.
Beyond the scheduled cleaning intervals, watch for these warning signs:
| Symptom | What It Means |
|---|---|
| Image appears hazy or blurry on the display | Dust or oil film on the lens |
| Sudden increase in false rejects | Optical contamination is degrading image analysis |
| Defects are being missed | The system cannot "see" defects clearly |
| Lighting appears uneven | Dust on lighting covers or lenses |
| Calibration fails or drifts | Optical surfaces are contaminated |
Do not wait for the weekly cleaning if you notice any of these signs. Clean immediately.
While the camera lens is the most critical component, a complete maintenance program should also address:
Lighting Systems: LED illumination degrades gradually—intensity drops approximately 20% in the first 1,000 hours. At 50% intensity, image contrast becomes insufficient for reliable defect detection. Clean lighting covers gently with a soft cloth. Monitor lighting output regularly.
Vision Processor Filter: Clean once per month, or more frequently in dusty environments. The filter is typically located underneath the user interface cabinet.
Part Detect Sensors and Reflectors: Clean regularly with a soft, lint-free cloth dampened with mild soap and water. Dirt buildup on these components can prevent the system from detecting parts properly.
Protective Glass and Plastic Surfaces: Clean weekly with appropriate solutions—glass cleaner for glass surfaces, mild soap and water for plastic surfaces. Never use glass cleaning solution on plastic surfaces, as it may damage them.
For label producers seeking to maximize inspection accuracy and minimize downtime, understanding the full maintenance picture—from lenses to lighting to calibration—is essential. Explore label inspection solutions designed for production environments
A cleaning schedule is only effective if it is consistently followed. Here is how to build a program that sticks:
Record all cleaning and maintenance activities—date, tasks performed, parts cleaned, and any issues found. This creates a maintenance history that helps identify patterns and refine the schedule over time.
Ensure all operators understand the importance of camera cleaning and the correct procedures. Improper cleaning—using the wrong cloth or applying too much pressure—can damage lenses permanently.
Create a simple checklist for daily, weekly, and monthly tasks. This reduces the chance of forgotten steps and provides accountability.
Track key metrics: false reject rate, defect detection rate, and calibration stability. A sudden change in any of these metrics often indicates that cleaning is overdue.
If you notice that lenses are getting dirty faster than your weekly cleaning schedule, increase frequency. If your plant runs cleaner than average, you may be able to extend intervals—but never beyond what the manufacturer recommends.
The question "how often should I clean the cameras on my automatic inspection machine?" has a straightforward answer: daily visual checks, weekly thorough cleaning, and monthly deep maintenance as a baseline—with adjustments based on your specific production environment.
But the broader question is this: are you treating your inspection system as a critical quality asset or as a set-it-and-forget-it tool? A vision inspection system running with a dusty lens, degraded lighting, or miscalibrated reference targets continues to produce inspection results—they are simply less accurate. The gap between apparent performance and actual performance widens silently until a quality failure forces the investigation.
Regular camera cleaning is not just maintenance—it is quality insurance. A clean lens costs minutes to maintain. A label error recall can cost hundreds of thousands of dollars.
Once you have established a disciplined maintenance routine for your inspection system, evaluating how it integrates with your broader label finishing workflow becomes the next logical step. For converters running high-speed label production, inspection is not a standalone function—it is part of a continuous quality loop that spans printing, finishing, and converting.
Label Inspection Machine Maintenance: A Complete Guide
How to Calibrate an Automatic Label Inspection System
Common Causes of False Rejects in Label Inspection—and How to Fix Them
Lighting in Machine Vision: Why It Matters for Label Inspection Accuracy
Building a Preventive Maintenance Program for Label Finishing Equipment
This article is part of Rhyguan's technical content library. No direct sales or pricing information is included. All technical discussions aim to help you make informed purchasing decisions.
● Another PLUS-330 Machine Installed in Latin America
● Another Two Installations at Customers’ Site
● Rhyguan Plus Month
● Top security level in Rhyguan
● Another Rotary Die-cutting Installation at Cutsomer’s Site
● Perfect Factory Acceptance Testing for Label Inspection Machines
● New Rhyguan Factory Preview
● Rhyguan Industrial 4.0 Live Presentation
GET A QUOTE